Recess Hinge Installation
RECESS HINGE INSTALLATION
If your hinge looks like  You have the Recessed Hinge WO
(WithOut Hurricane Strut)
You have the Recessed Hinge WO(WithOut Hurricane Strut)
And the Recessed Hinge WO has Parts and Instructions included
in each Package with more Instructions below.
in each Package with more Instructions below.
If your hinge looks like  You have the Recessed Hinge WM
(With Hurricane Strut)
You have the Recessed Hinge WM(With Hurricane Strut)
You have a very rare Hinge/Hurricane Strut combination. Parts are Available for free.
To get your free parts the instructions are below in the RECESSED HINGE WM section.
RECESS MIDDLE HINGE WO INSTALLATION (without metal strut)
Attaching to the middle brackets on your garage door with the Recessed Hinge WO will require using the screws of the hinge. (unlike the 94% of garage doors that have the hollow tube hinge.


Use a Star Key Tool, Hex Head Allen Wrench, or a Flat Screwdriver
(Please Note your screw may be very tight to start, You may need to use vice grips on your tool's shaft and push the tip of the tool hard into the screw for extra torque with out stripping the screw head)
Use the U shaped bracket Shown Here.
It is very important to mount this top bracket on the Bottom of the upper recessed hinge, as shown in this picture. (with the tube up)
Use the U shaped bracket
Shown Here.It is very important to mount this top bracket on the Bottom of the upper recessed hinge, as shown in this picture. (with the tube up)
Then Mount the Lower Zip Tie Bracket 
to the Top of the lower recessed hinge, as shown in this picture.
to the Top of the lower recessed hinge, as shown in this picture.
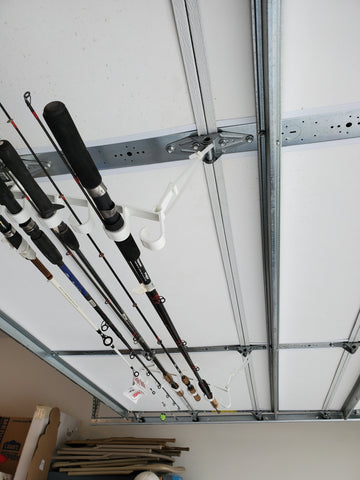
Then Simply Hook the Hooks Rack 

As Shown in these pictures.
Next, run a zip tie through the zip tie Bracket, 
And through the hole above the leg of the Hooks Rack.
So it is slightly snug, but not too tight.
Then to finish, cut off the end of the Zip Tie.
And through the hole above the leg of the Hooks Rack.
So it is slightly snug, but not too tight.
Then to finish, cut off the end of the Zip Tie.
REMEMBER TO MOUNT THE MAJORITY OF THE WEIGHT BETWEEN THE HOOKS !
(not with the majority of the weight hanging over the one end.
(not with the majority of the weight hanging over the one end.
REGRETTABLY, With the Rare Recessed Hinge, you cannot stack your sets, but you can mount two sets side by side. (that is unless you have a 5 panel garage door, in which case you can mount on panels 2 and 4 OR use the Swing Free or 6 Inch Slack Method at the end of this page)
Here are Pictures of Side by Side.
 ,
,  ,
, 
, , ALSO, If you only have a single middle recessed hinge, or are mounting two sets you will need to use the end hinges.


Here are pictures of the Recessed End Hinge Mounting.
RECESSED END HINGE WO INSTALLATION (without metal strut)
You do the ends the same way as the middle EXCEPT getting the bracket on the lower part of the top end hinge can be a little tricky.
Step 1: Mount Just one end of the Bracket. 
and turn it sideway as shown above.
and turn it sideway as shown above.
Step 2: Here is the Tricky Part. Hook Your 
Hooks Rack BEFORE attaching the other end of the bracket.
Hooks Rack BEFORE attaching the other end of the bracket.
Step 3: While Keeping your Hooks Rack Hooked, 
Secure the other end of the bracket. As Shown above.
Finish by attaching the bottom bracket and zip tie
Just as you did for the Middle Bracket as instructed in the section above. Once again, Tighten zip tie till it is barely snug, but not too tight.
REMEMBER TO MOUNT THE MAJORITY OF THE WEIGHT BETWEEN THE HOOKS !
(not with the majority of the weight hanging over the one end.
(not with the majority of the weight hanging over the one end.
RECESSED HINGE WM INSTALLATION (With 3 inch Metal strut)
Since the combination of having both the Recessed Hinge AND the 3" metal strut is very rare, These parts were never molded or included in the package. (Mostly found in Florida or sometimes the Eastern Seaboard).
HOWEVER: Brackets for the combination of the Recessed Hinge with the 3" metal strut are available free of charge.
To Acquire brackets simply Email 4thwallsolutions@gmail.com or call 816-454-9954 (my home landline) with the following info.
1. That you desire the Brackets for the Recessed Hinge WM
(Top of Page 3 and Page 3D on your installation instruction sheet.)
(Top of Page 3 and Page 3D on your installation instruction sheet.)
2. Your mailing address.
3. Number of sets you purchased.
If you purchased more than 1 set, or are considering a second set, please email a picture of the end hinge on your garage door.
If you purchased more than 1 set, or are considering a second set, please email a picture of the end hinge on your garage door.
To be sure, if you send me pictures of your garage door panel's end hinge and another one with your entire garage door with your request to 4thwallsolutions@gmail.com, we can both be sure I am sending you the right brackets the first time.
REGRETTABLY, With the Rare Recessed Hinge, you cannot stack your sets, but you can mount two sets side by side. (that is unless you have a 5 panel garage door, in which case you can mount on panels 2 and 4 OR use the Swing Free or 6 Inch Slack Method at the end of this page)
Here are some pictures of the Recessed Hinge WM installation.
(Full instructions included with the new brackets and a clear installation sheet will be emailed with your parts request.

These Brackets install easily with an open end wrench, socket set or nut driver.
These Brackets install easily with an open end wrench, socket set or nut driver.
For Additional Help, Please email me or Call Me.
John Meyer 816-454-9954 Home Landline 4thwallsolutions@gmail.com
John Meyer 816-454-9954 Home Landline 4thwallsolutions@gmail.com
SWING FREE OR 6 IN. SLACK METHOD FOR STACKING HOOK'S RACKS
The Swing Free and the 6 inch slack method are exactly what they sound like. If you are stacking your hooks racks sets on recessed hinges, and some of the other rare types and hinge/hurricane strut combinations, It maybe necessary to use one of these methods on your upper set of Hooks Racks so your lower set does not crush and break when running into the upper rack at the turn in the track on the way up.
The Swing Free Method is not to attach the bottom of the Hooks Rack and allow it to swing free and out on the way up to avoid the top of the lower rack. (Actually this is the way it was originally designed to work)
The 6 Inch Slack Method is attach the zip tie very loosely to the bottom of the Hooks Rack and allow it to swing out about 6 inches on the way up to avoid the top of the lower rack. (Actually this is the way it was originally designed to work)
Here are some Pictures of the Swing Free and 6 Inch Slack Method.


For Additional Help, Please email me or Call Me.
John Meyer 816-454-9954 Home Landline 4thwallsolutions@gmail.com
John Meyer 816-454-9954 Home Landline 4thwallsolutions@gmail.com