Buckle Hinge Installation
Buckle Hinge Installation Page:
If your hinge looks like: or
or 
You have the fairly rare Buckle Hinge.
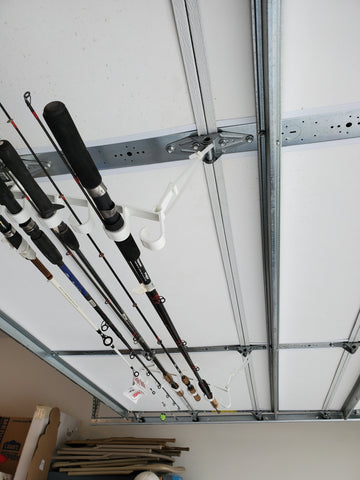
Your Hooks Rack Set should have come with Brackets that look like this:
The Buckle Hinge, because of it's many types of Installations, may seem complicated to install. But once you line up the right pictures with your type installation, you should find that no drilling or new screws are required.
Here are the types of Buckle Installations to consider:
1. One Set Double Door (18" and 21" Panels)
2. One Set Single Door (18" and 21" Panels)
3. Two Sets, Double Door, Side By Side (18" and 21" Panels)
3A. Two Sets, Double Door, Side By Side WITH 3" Hurricane Struts
4. Two Sets, Double Door, Stacked (21" Door Panels)
5. Two Sets, Double Door, Stacked (18" Door Panels)
6. Two Sets, Single Door, Stacked (21" Door Panel)
7. Two to Four Sets, Double Door, Stacked and Side by Side AND using the end hinges ON a 21" Door Panel. (Works with most 3" Hurricane Struts)
8. Two to Four Sets, Double Door, Stacked and Side by Side AND using the end hinges ON an 18" Door Panel (Works with most 3" Hurricane Struts)
9. Other Options working with Buckle Hinge and 3" Hurricane Struts.
Type 1: Buckle Installation, One Set on Double Door (18" and 21" Panels)


Step 1: Attach Top Step 2: Attach Bottom Step 3" Attach Hooks
(B3) in Middle Height Bracket (B4) as shown. Rack and attach Zip
Position as shown. Tie as Shown and
clip off end. Do not
over tighten Zip tie
There is a Non Zip Tie Option to the One Set on Double Door on 21
IT IS VERY VERY IMPORTANT NOT TO USE THE LOWER BRACKET AS SHOWN BELOW IF YOU ARE PUTTING THE UPPER BRACKET AND THE LOWER BRACKET ON TWO DIFFERENT PANELS!
YOU MUST USE THE ZIP TIES TO ANCHOR THE BOTTOM OF YOUR HOOKS RACK!
(The Hooks rack moves a lot on the way up at the turn.) 

Step 1: Attach Top Step 2: is a little tricky, first twist and attach
(B3) in Middle Height Bottom Bracket (B4) onto the end of the Hooks
Position as shown, Rack Leg as shown. Then hook the top of the
just like Step 1 Hooks Rack to the Top Bracket and Mount the
Bottom Bracket as Shown.
Type 2: Buckle Installation, One Set on Single Door (18" and 21" Panels) (It uses one end hinge)


Step 1: Attach Top Bracket (B3) Step 2: Attach Bottom Bracket
In High Position on both a Middle (B4) on both a Middle and an
and an End Hinge as Shown End Hinge as Shown
 WARNING: ALWAYS USE
Step 3: Attach the Hooks Racks to the THE ZIP TIES IF TOP AND
Top Brackets and Zip Tie the Racks to BOTTOM BRACKETS ARE
The Bottom Brackets as Shown ON DIFFERENT PANELS !
Type 3: Buckle Installation, Double Door, Side By Side (18" and 21" Panels)


This installation is the same as Single Door installation in Type 2:
Except you do it twice and you use both end hinges, as shown above.
WARNING: ALWAYS USE THE ZIP TIES IF TOP AND BOTTOM BRACKETS ARE ON DIFFERENT PANELS !
(like in Type 3 above and Type 3A if using the left picture version below)
Type 3A: Two Sets, Double Door, Side By Side WITH 3" Hurricane Struts
Mount same as Type 3 if you can. If a hurricane strut is too close to the
top you can cut off the Top Bracket (B3) and install right side up,
(Middle picture below), or if you need to, upside down. (right picture) to miss the Hurricane Struts.


(Full Garage Door with Struts Picture not available yet)
Type 4: Two Sets, Double Door, Stacked (21" Door Panels)
(More coming soon on Type 4 installation)
Type 5: Two Sets, Double Door, Stacked (18" Door Panels)
This is the same as Type 1 except you use panels 2 and 4.
(Skip Panel 3)
Type 6: Two Sets, Single Door, Stacked (21" Door Panel)
(More coming soon on Type 6 installation)
Type 7: Two to Four Sets, Double Door, Stacked and Side by Side AND using the end hinges ON a 21" Door Panel. (Works with most 3" Hurricane Struts)
(More coming soon on Type 7 installation)
Type 8: Two to Four Sets, Double Door, Stacked and Side by Side AND using the end hinges ON an 18" Door Panel (Works with most 3" Hurricane Struts)
This is the same as Type 3 and 3A except you use panels 2 and 4.
(Skip Panel 3)
Type 9: Other Options working with Buckle Hinge and 3" Hurricane Struts.
(More coming soon on Type 9 installation)


Thank you for your patience.
John Meyer - Inventor
4thwallsolutions@gmail.com
816-454-9954 Home Landline